Admin console - configuration
Introduction
When the GraFx extension is enabled, admins can manage the configuration and settings in the Kadanza Admin Console.
1. Templates
Templates are the starting point for every project in the GraFx Experience Layer. They define what layouts are available, which fields users can edit, and how permissions are applied. In short: they’re the blueprint for brand-consistent outputs.
1.1. Template overview
When you open the Templates section in the admin console, you’ll see a list of all configured templates.
- Each row shows the Reference ID, Name, GraFx External ID, Status, Layouts count, Version, Last Sync, and Last Updated.
- From the context menu (⋮), you can quickly View, Edit, or Resync a template.
- Use the Search bar to quickly find a template by name or ID.
- To add a new template, click the New template button in the top right.
1.2. Creating a new template

Click New template to open the creation screen.
- Reference: A unique value to identify the template.
- Name: The name of the template. This name is used throughout the configuration and is presented to the end-users when creating a project.
- Description: A short description with some template and layout context for the admins
- GraFx External ID: This is the ID of the CHILI GraFx template. You can find the ID in the URL after opening the template in CHILI GraFx.

- Status: Projects can be created from active templates; inactive templates aren’t visible for end-users
- Supported locales: define which languages are supported in the template.
- Fields: Fields are used to add metadata and permissions to a template. Admins can choose from the fields that are made available for templates
- Type user group: when selected, the admin can list the user groups that can have access to the templates
- Other types: can be used to add extra metadata to a template, like type, output intent,…
- Workflow settings: This advanced option allows you to link specific GraFx user interfaces for specific user groups. The workflows are defined inside GraFx Studio and can be assigned to user groups in Kadanza. Users from the selected user groups will see the workflow assigned to them.
Once all required information is filled out, click Save to create the template.
When a template is configured in the content store, all available layouts will be visible. You can hide layouts from a template in the CHILI editing experience.

1.3. Editing an existing template

Select Edit from the context menu in the template list to update an existing template. You can:
- Change the Name, Description, or Status.
- Upload a Main visual. This is presented to the end-user in the content store. If no image is uploaded, the brand logo is used as fallbackManage Fields:
- Add new fields, update existing fields and remove unused ones.
-
Select fields can be used to add metadata to a template, which can be used by end-users to search and filter


-
Usergroup type fields are used to define access to the template. These fields are used in the Content Store settings to configure template visibility, only users from the selected user groups will see the templates when loading the content store. When no permissions are set on an individual template, it will be visible to all users.


- Configure Workflow settings: This advanced option allows you to link specific workflows to specific user groups. The workflows are defined inside GraFx Studio and can be assigned to user groups in Kadanza
After making changes, click Save to apply them.
⚠️ Note: Editing a template only affects future projects created with it. Existing projects remain unchanged.
1.4. Template versioning
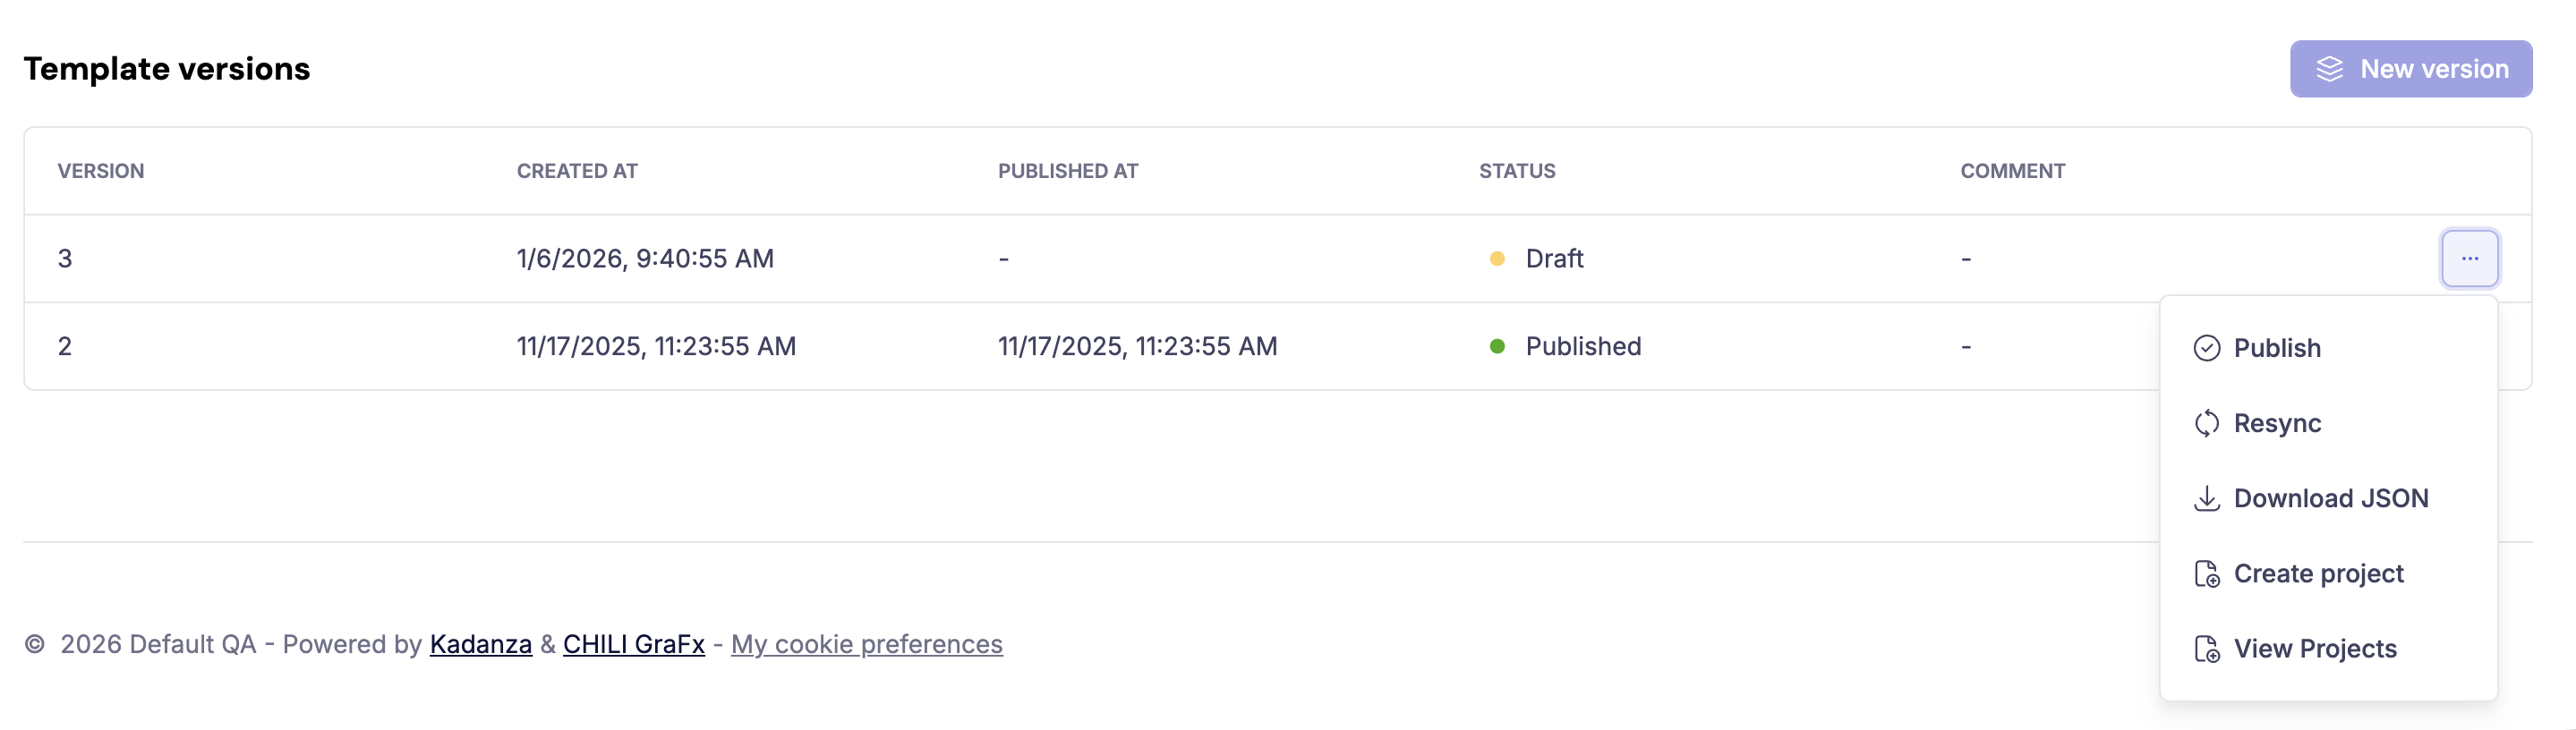
Versioning allows admins to create and test new versions of a template while the existing one is still available for users. In the template detail page, admins can see an overview of the different template versions and whether this is a draft or a published version.
When a new template is configured in Kadanza, the first version is a draft version.
This draft needs to be published before the template can be activated and used. When changes are made to the template in GraFx Studio, a new version needs to be created so the changes are synced to Kadanza. To use this updated template, a new version should be created. When all the previews are generated, this draft version can be tested, and when everything is ready, this draft can be published so users can work with the updated template.
When a new template version is created, admins can
- Resync: when changes are made to a CHILI GraFx template (inside CHILI), these changes need to be synced to Kadanza. Syncing changes from CHILI is possible for both draft versions and published versions.
- Publish: after testing the new version, admins can publish this versions for users to work with. New projects are always created from the most recent template version.
- Download JSON: this advanced feature allows you to download the source file (JSON) of the CHILI template.
- Create project: you can test new template versions by creating a project from a draft version. All available layouts will be selected, and a new project is created for the admin user.
- View projects: filters the list of projects for a specific template version.
When a user creates a project, the most recent published version will be used. Projects created from older versions will still be available for users (edit, duplicate, download, order). In a later release, it will be possible to disable (expire) old template versions, after which users can no longer edit or duplicate projects made from expired versions.
⚠️ Note: When you create a brand new template, make sure to publish the first version in the template details page so your template can be used. And when changes are made to the template i GraFx Studio, make sure to create and publish a new version to allow users to work with the updated template.
2. Projects
Projects are created by end-users based on templates. Each project bundles together one or more layouts, field values, and outputs. From the admin side, the Projects section allows you to monitor what users are creating, check configurations, and troubleshoot if needed.
2.1. Project overview
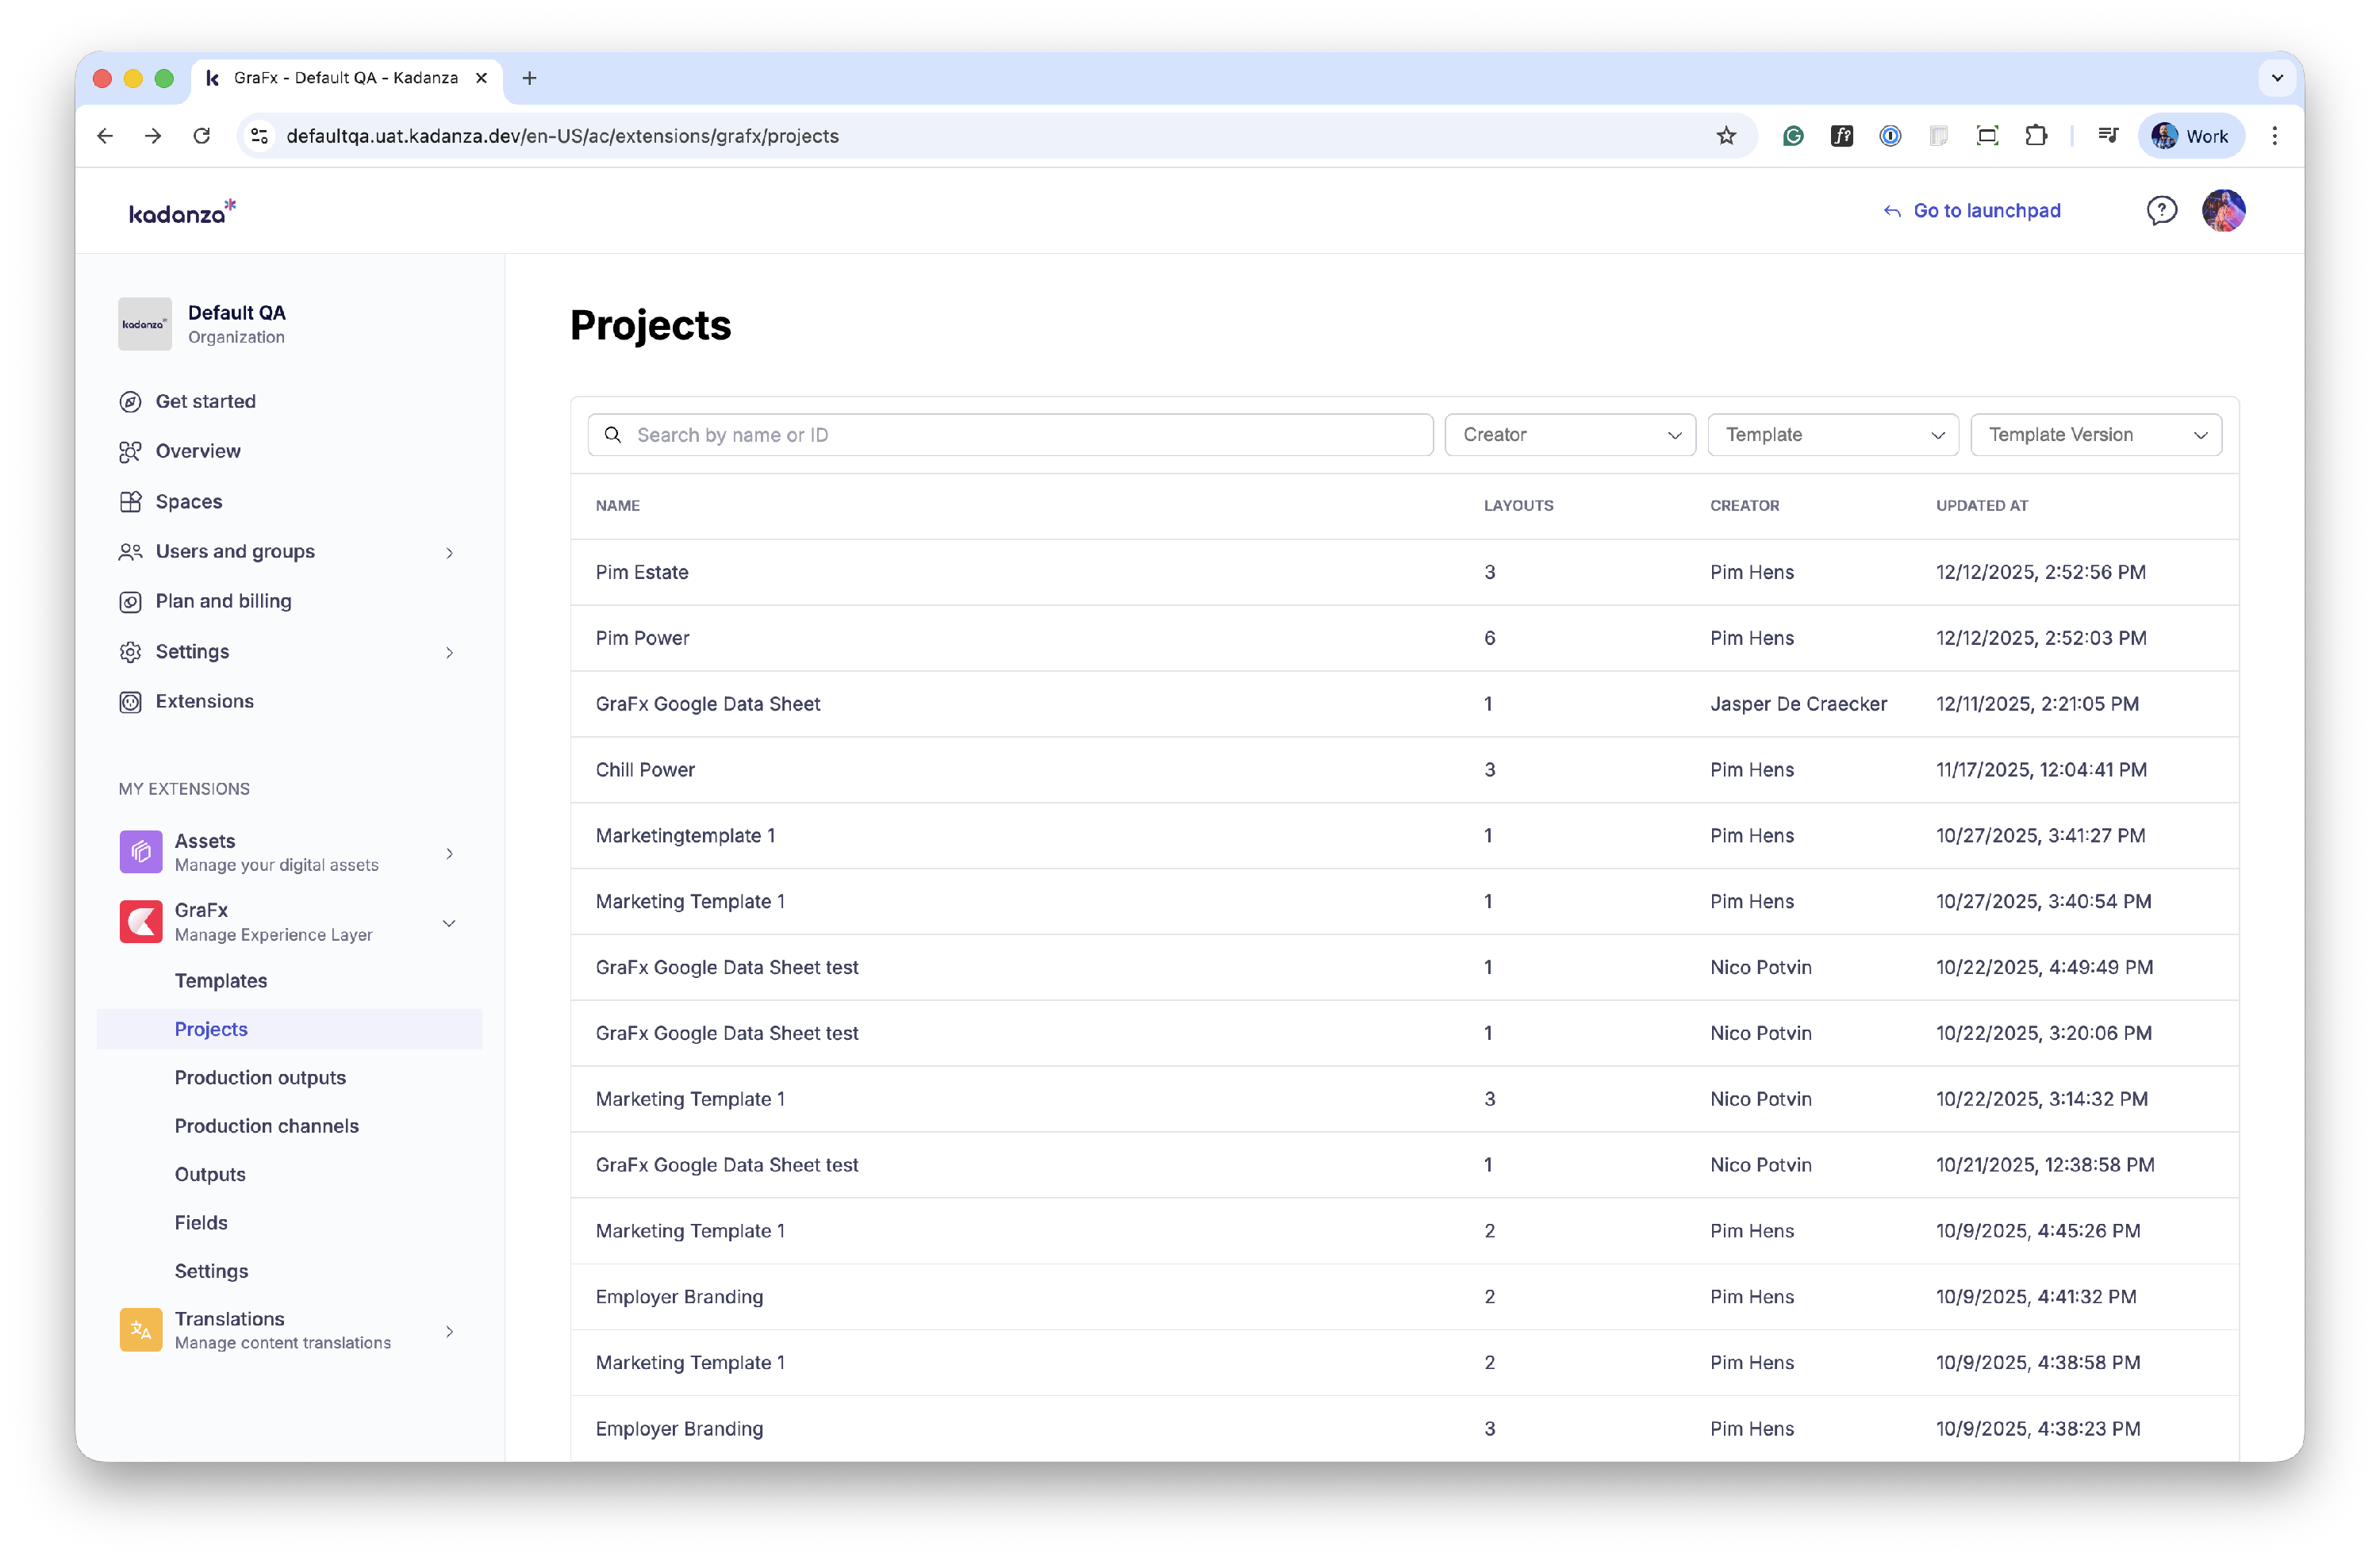
When you navigate to the Projects section in the admin console, you’ll see a list of all projects created in the platform (see screenshot 1).
- Columns include:
-
Name: Project name, inherited from the template or entered by the user.
Status: The current status of the project. Possible statuses are
- New
- Submitted
- In production
- Rejected
- Cancelled
- Delivered
- Mixed
- Layouts: Number of layouts included in the project.
- Creator: The user who created the project.
- Production Output: Shows if a production output has already been generated.
- Updated At: Timestamp of the last modification.
-
- The context menu (⋮) on each project row allows you to view project details.
- You can also use the Search bar or filter dropdown (top right) to find projects quickly.
Note: it is not yet possible to delete any projects from the projects list
2.2. Project details

Click View from the context menu to open the detail page of a project. This project details page is divided into sections:
General Information
- ID: Unique identifier of the project.
- Name: Project name.
- Template: The base template the project is built on (clickable link back to the template).
- Created / Last update: Timestamps and the name of the user who created or modified it.
Field Values
-
Displays the fields and their assigned values within the project.
Examples:
- Template access (type usegroup) → which user group(s) can use the template in the content store.
- Template type (type select) → what kind of template, or template purpose
Layouts
-
Shows all layouts included in the project.
For each layout, you’ll see:
- Name and ID
- GraFx External ID
- Status (new, in progress, etc.)
- Output intent (e.g., print, digital)
- Dimensions
- Parent layout (if applicable)
- Flags for Selected, Unlinked, Resizable
- Last updated timestamp
3. Production outputs
Production outputs represent the final deliverables that users generate from their projects. They can be downloaded (single or in bulk) or they are connected to production channels (such as printers or digital endpoints), containing order details, layouts, and statuses. Production outputs can be both digital and print.
3.1. Production outputs overview

In the Production Outputs section, you see a list of all outputs created across projects (see screenshot 1).
Each row includes:
- Project Name: The source project the output belongs to.
- Production Channel: The production channel used for the output (e.g., Printer1, Printer2).
- Layouts: Number of layouts included in the output.
- Creator: The user who initiated the output.
- Updated At: Last modification timestamp.
Features of the overview screen:
- Use the search bar to filter outputs by name or ID.
- Scroll or paginate through the list if many outputs exist.
- Click the context menu (⋮) next to an output to open the detail view.
3.2. Production output details
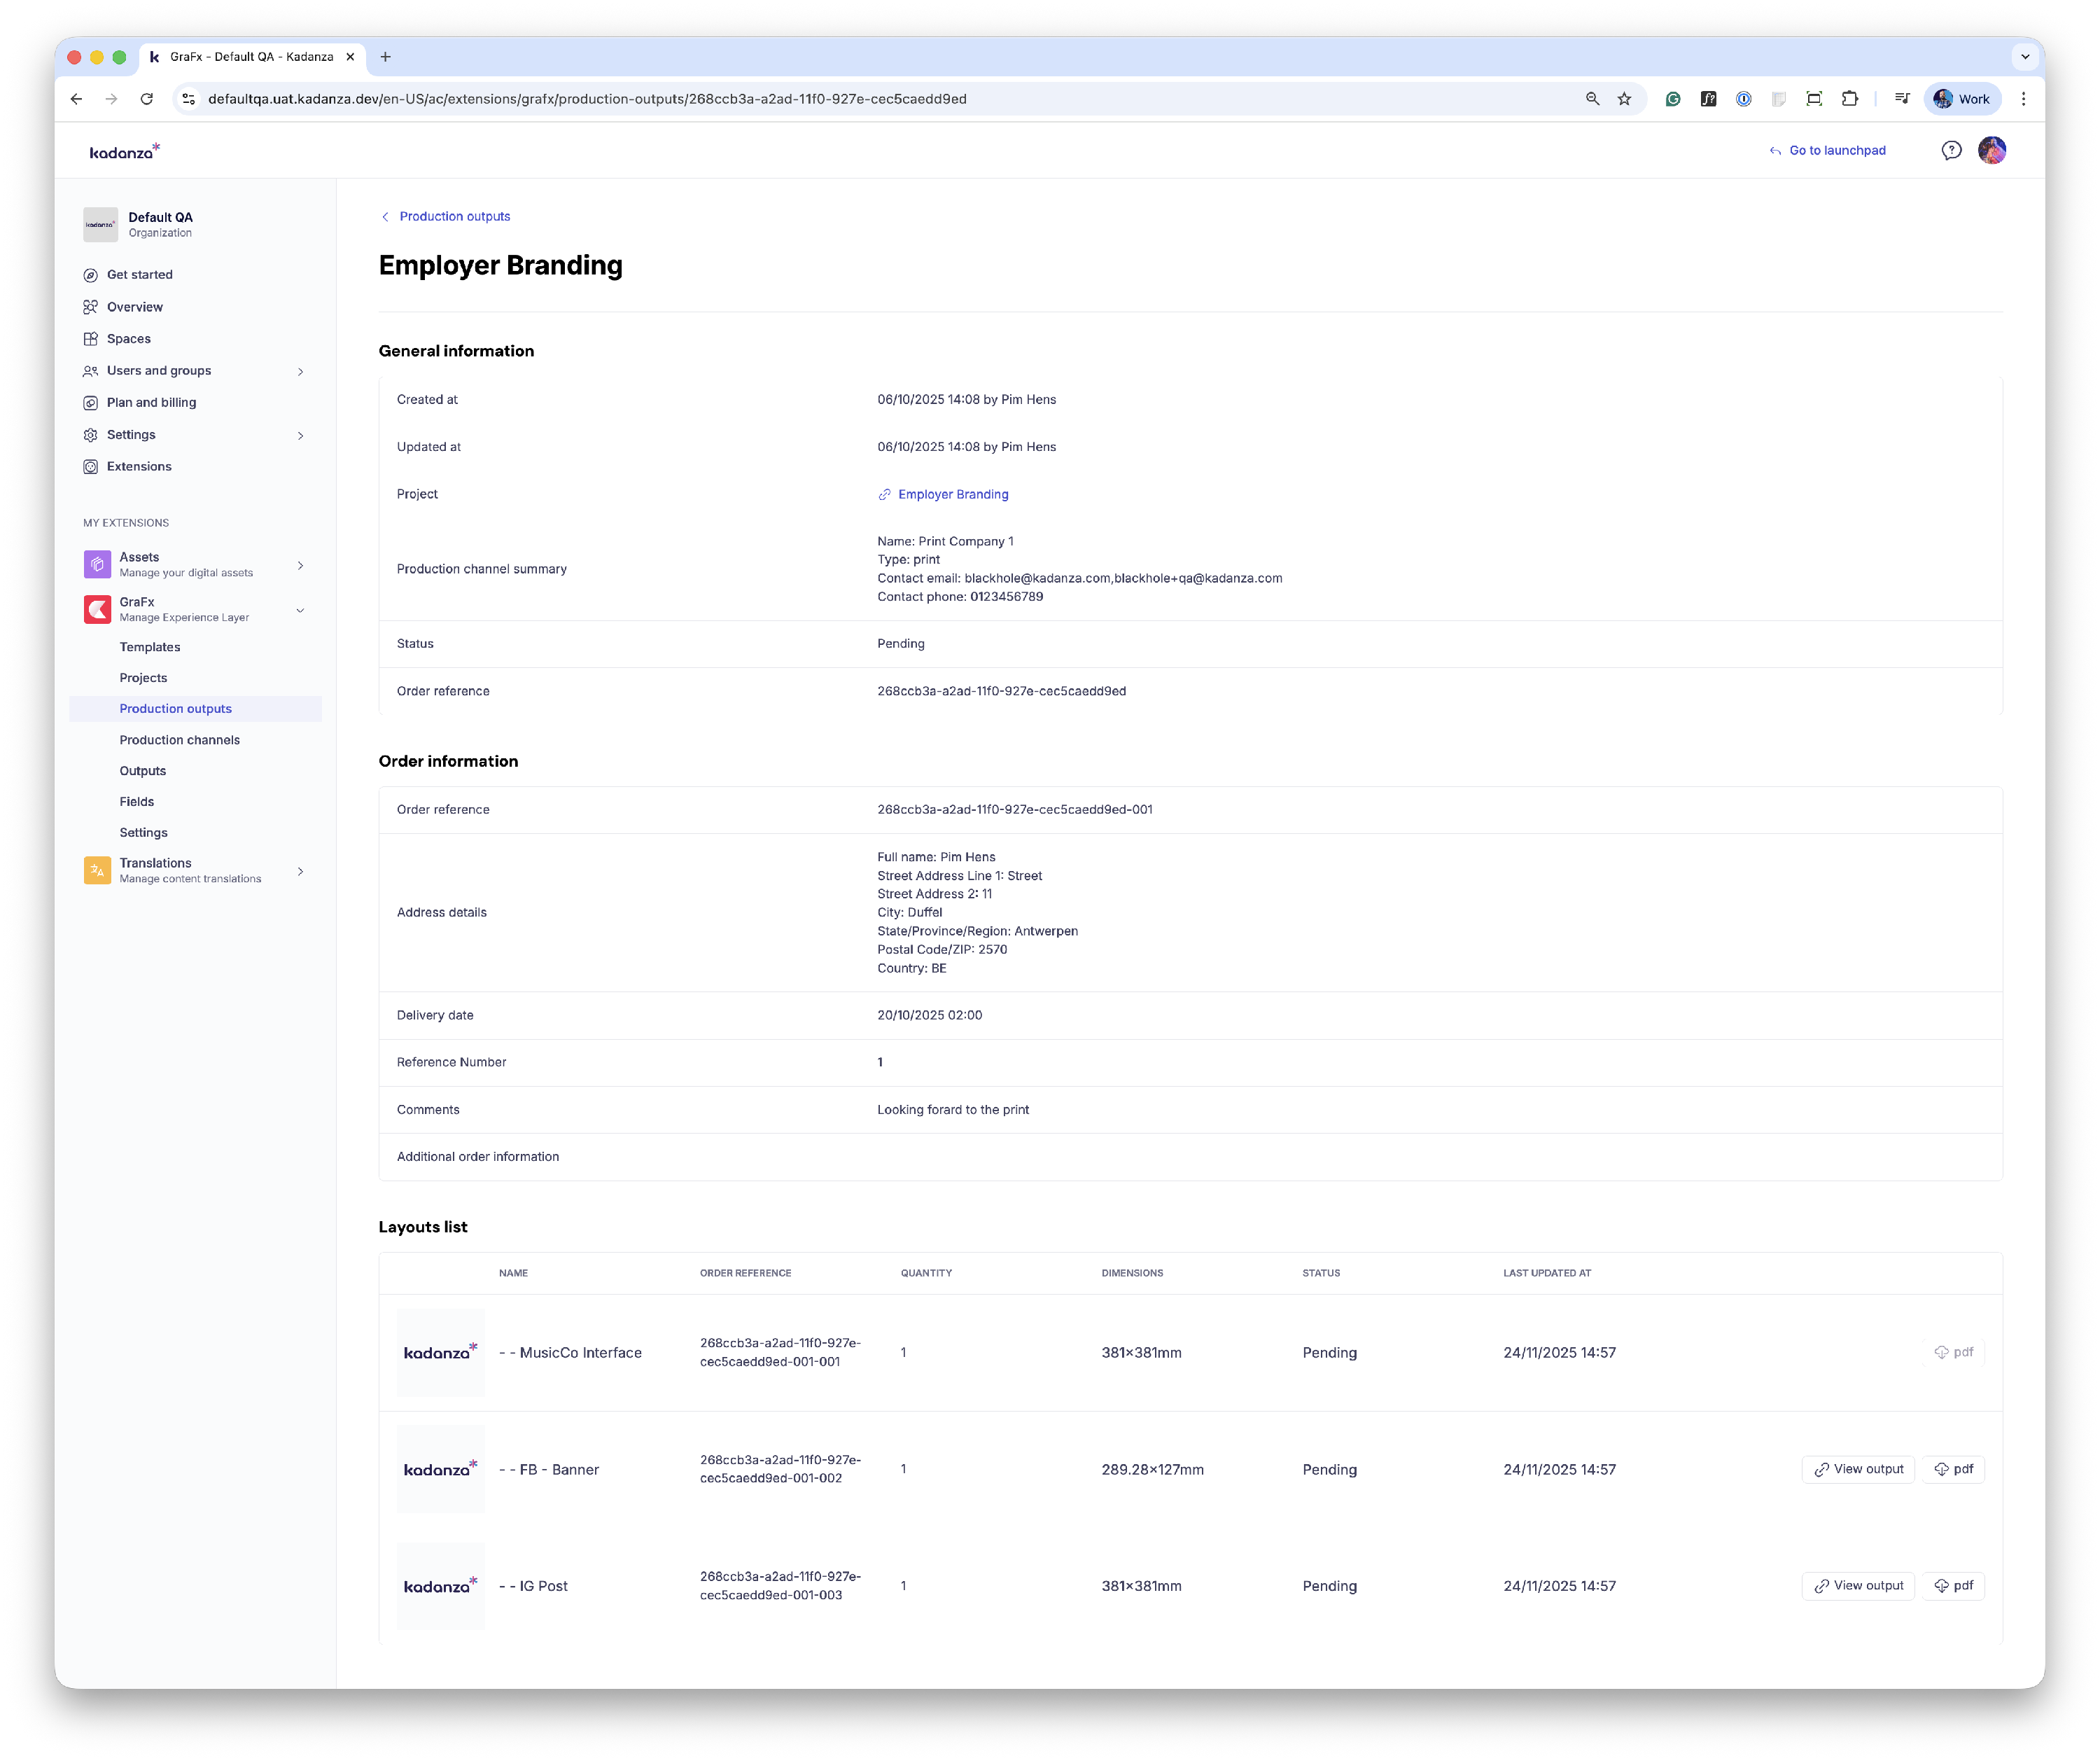
Click View to open the detail view of a specific output. The detail view is divided into clear sections:
General Information
- Created at / Updated at: Timestamps and the user who created or last updated the output.
- Project: Link to the originating project.
- Production Channel Summary: Shows channel name, type (e.g., print), and contact details (email and phone).
- Status: Indicates whether layouts are Submitted, In Production, Rejected, or Mixed (combination of statuses).
Order Information
- Address details: Shipping or delivery information.
- Delivery date: Target date for fulfillment.
- Reference number: Optional field for tracking orders.
- Comments / Additional order information: Space for notes or special instructions.
Layouts List
Each layout included in the production output shows
- Name and Quantity
- Dimensions (e.g., 800×600mm)
- Status (Submitted, Rejected, In Production)
- Last updated at: Timestamp of latest change
- View output: Opens the details of the output
- PDF export button: Quick access to download the production-ready file
4. Production channels
4.1. Production channels overview

In the Production Channels section, you’ll see a list of all available channels.
- Name: The channel’s name (e.g., Printer1, Printer2).
- Type: The type of channel (e.g., print, digital).
- Updated At: Timestamp of the last modification.
Actions available:
- New Production Channel → create a new channel.
- Context menu (⋮) → edit an existing channel.
- Search bar → quickly find a channel by name or ID.
4.2. Creating a new production channel

Click New production channel to open the configuration form.
- Name: The name of the channel.
- Contact Phone / Email: Details of the production contact person.
- Type: Select the channel type (e.g., Print).
- Available for User Groups: Define which user groups can see and use this channel.
- Production Outputs available for User Group: Specify which outputs from this channel are visible to certain groups.
- Fields: Add custom fields if needed (e.g., cost center, internal notes).
After filling out the details, click Save to create the production channel.
4.3. Editing an existing production channel

From the channel overview, select Edit in the context menu to update a channel. Here you can:
- Change name, phone, or email.
- Adjust the type (e.g., print → digital, if needed).
- Add or remove user groups that can access the channel.
- Manage which production outputs are available to which user groups.
- Add or update custom fields.
5. Outputs
The Outputs section lists all generated previews for both templates and projects.
These are not production outputs — they are preview files used to check visual layouts and content before sending anything to production.
Admins can use this section to monitor the status of previews, relaunch failed ones, or download finished files for verification.
5.1. Outputs overview

In the Outputs overview screen, you’ll find a list of all preview files that have been created.
Each record includes:
- Name: Name of the generated preview
- Output Type: Indicates whether the preview comes from a project or a template.
- File Type: The format of the generated preview (e.g., JPG, PDF).
- Status: The current generation status (Finished, Processing, or Failed).
- Created At / Updated At: Timestamps for tracking preview history.
From the context menu (⋮) next to each output, admins can:
- View: Open the output detail page.
- Download: Download the preview file directly.
- Relaunch: Restart the generation process if a preview was not generated or failed.
You can also use the search bar to find a specific preview by name or ID, and apply filters by status or output type.
5.2. Output details

Click View from the context menu to open the details of a specific output (see screenshot 2).
The details page provides full information about the selected preview:
General
- GraFx External ID: Unique system identifier for tracking.
- Status: Generation status (e.g., Finished, Failed).
- Download URL: Direct link to access or download the generated file.
- Output Type: Identifies if it’s a template preview or project preview.
- Error Message / Error Report: Fields used to diagnose failed generations (if applicable).
- Created By / Created At / Updated At: Metadata showing who generated the preview and when.
6. Fields
Read all about fields here.
7. Settings
The GraFx settings section allows admins to configure some more advanced functions for the GraFx Experience Layer

7.1. Environment settings
Whenever changes are made in your GraFx Studio environment (like permission changes in the integration), the latest settings from GraFx Studio should be synced with Kadanza. Use the refresh buttons to sync the latest settings from GraFx or to refresh the access token after making permission changes on your integration in GraFx Studio.
7.2. Production outputs settings
When generating production outputs, a default output reference prefix can be added to the order reference. This optional prefix for Production output references (max 5 alphanumeric characters) will be added automatically to the order reference when ordering a production output.
7.3. Preview output settings
This section allows admins to configure specific output settings used for template & project previews per layout intent. Configuring specific output settings allows admins to set up specific preview options for different templates, like static watermarked previews or specific previews for animated content.
The output settings are defined in GraFx Studio and are made available in Kadanza. If no option is configured, the standard JPG setting will be used as a fallback.